Tips and Tricks: Atmospheric Perspective (Inking)
Continuing on Kevin's theme from last week, let's talk about atmospheric perspective as it relates to inking.
This will be a little similar to a previous post on Spotting Black Areas, but a little more particularly pointed at dealing with distance in the daytime. Doing this effectively will make your panels look wonderfully deep and rich, and doing it poorly will result in your panel looking flat, boring, and worst of all, confusing.
This is a little different from the coloring lesson in that inking is kind of a one-shot step-- you have to do things right, because you can't erase or tinker with levels like you can when you're coloring on the computer. Of course, if you're inking on the computer, you can. But we're not at that level yet 'round these parts.
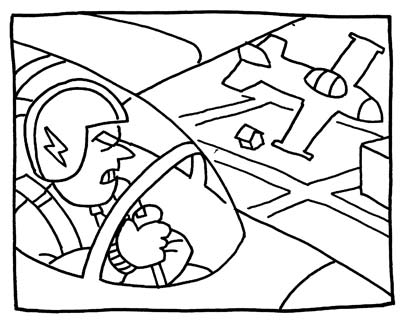
Here we have our starting image. Basically, there are three layers: the cockpit of the plane in the foreground, the middleground plane, and the ground in the background. Right now, this panel looks pretty flat, although we can tell what's going on. The steps in making this panel look deeper using atmospheric perspective will be attached to each layer.
Step One: Foreground Layer
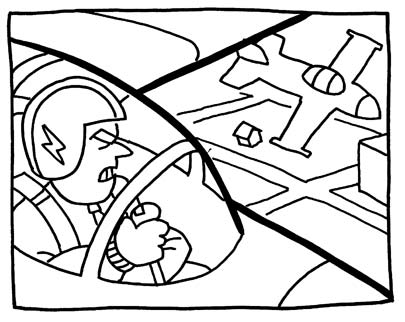
First, let's just pop the layer out a little bit. Thick lines around the main shape start to make it seem a little closer and more vivid. Even though this is kind of an abstraction from real life (things don't really have outlines, I hate to tell you), it reads like an increase in contrast, and, like the atmospheric coloring lesson, the basic concept is that contrast on objects is high close to the viewer, and lower as they recede.
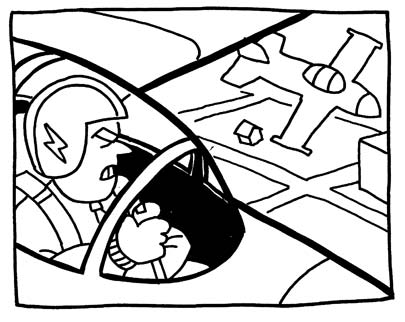
Then, let's just decide that the inside of the cockpit will be dark. It adds a certain weight to it, and makes things simpler and more contrasty. I also thickened up the lines around the cockpit, as well as the bars or whatever they are that go over the canopy. I haven't gone in to work on the pilot yet, but notice that I didn't thicken up the lines ON the wing or around the nose. Those are seams in the surface of the plane and they should seem very flat-- they don't cast shadows, so they should stay as light as possible so as not to detract from the overall shape of the plane.
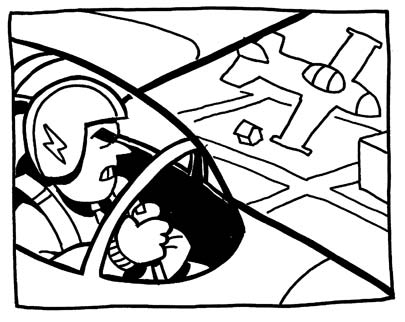
Then I went in and added some more stuff to the pilot. Shadows behind his head, under his chin, and under his arm make him look more like a physical presence, and darkening his eyebrow brings a little bit more focus to his face.
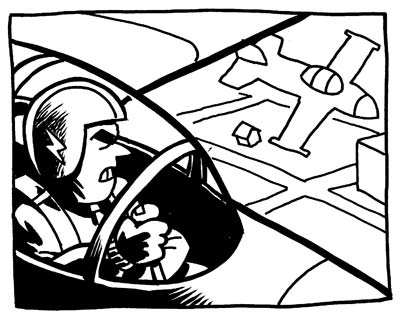
Finally, I was thinking that the foreground didn't look distinct enough, so I added some directional shadows on the near side of his helmet and arm and the outside of the plane. What this does from a logical point of view is establish the light source and give the foreground more contrast, but also, from a compositional point of view, it clusters a bunch of dark areas over into a relatively unified clump in the lower left corner, which helps focus the reader's eye on the main subject of the panel.
Step Two: Middleground Layer
For the upcoming layers, you'll find that treading lightly is your best bet, as less black helps a great deal in making each layer look distant. But we do have to make the middleground distinct from the background, so...
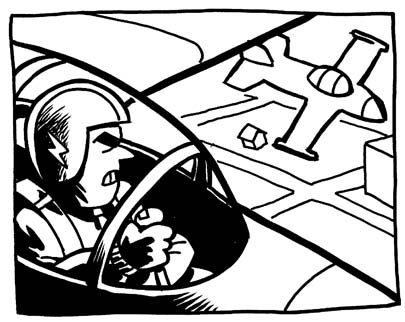
The first thing I did here was thicken the lines of the middleground plane, making certain that I don't make them as thick as the foreground one. You'll see that I screwed up on the nose and wing, and it kind of hurts the illusion. Oh well-- maybe the next step will fix it.
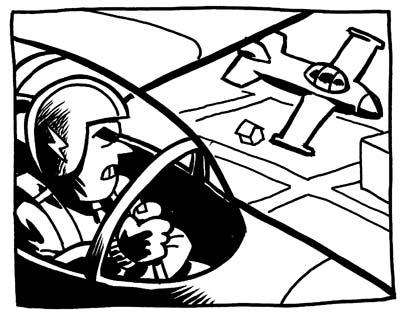
As we've established the direction of the light, let's put some shadows on the near surface of the middleground plane. Restraint is admirable here-- at a glance, the reader only needs to know that something is there, not necessarily every detail of its appearance, so a few blobs of black will work well enough to establish the plane's presence. I also dropped a few blobs into the cockpit to give that a little weight.
Step Three: Background Layer
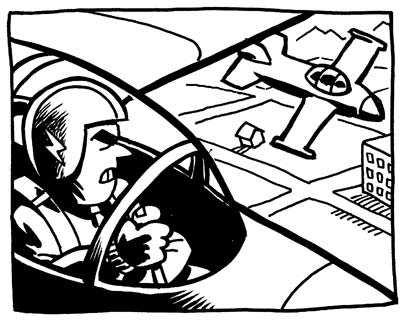
By the time we get back to the background in these sorts of pictures, we're pretty far away, so I don't want to really add any solid black areas, or we'll start flattening things out. The background, particularly in this panel, is like the equivalent of a matte painting in a movie-- it's pretty, and it adds atmosphere, but it isn't something that you can interact with, so there's no point in distinguishing individual physical objects within it. So I just added some windows to the building, and hatched out a shadow that has no solid black in it, then added a little more detail in the distant background to fill in some of the white area, which was starting to look a little flat. If the illustration is going to be in color, you might choose, instead of hatching for the shadow, to just use a thin pen to outline the shadow and then drop in a very slightly darker color into it. Hatching or crosshatching in color work can sometimes look sloppy, and a color shadow in the distant background might look a little nicer.
With that, we've got a relatively effective picture that has depth and weight to it, despite being drawn quickly, and in a very simple art style. Questions? Comments? Join us in the ...comments.
Labels: Tips and Tricks

2 Comments:
What about the white line (or lack of touching black lines) around objects that are in front of other objects? I see you are doing that with the middle ground jet but not for the foreground jet. I have done it both ways and while the white line around objects helps distinguish things from the background, it complicates coloring. Maybe it just works for B&W drawings.
Complicates coloring for WUSSES. Uh, anyway, I actually didn't have the lines from the background or middle ground touch the plane in the foreground, either, but when I thickened up the foreground lines, it ended up closing that gap.
I think the gap is a bit of shorthand for the refocusing your eye does as it moves from a near object to a far object. When you're looking at the edge of the near object, both the focus depth and the stereoscopic effect of your eyes prevents you from clearly seeing distant objects behind it-- that's why I do it, and there's also less danger of making the foreground and background look attached to each other.
When you are working in color, and you have some of the tricks that Kevin spoke of at your fingertips, this sort of trickery is unnecessary and can look bad. Like you say.
Post a Comment
<< Home